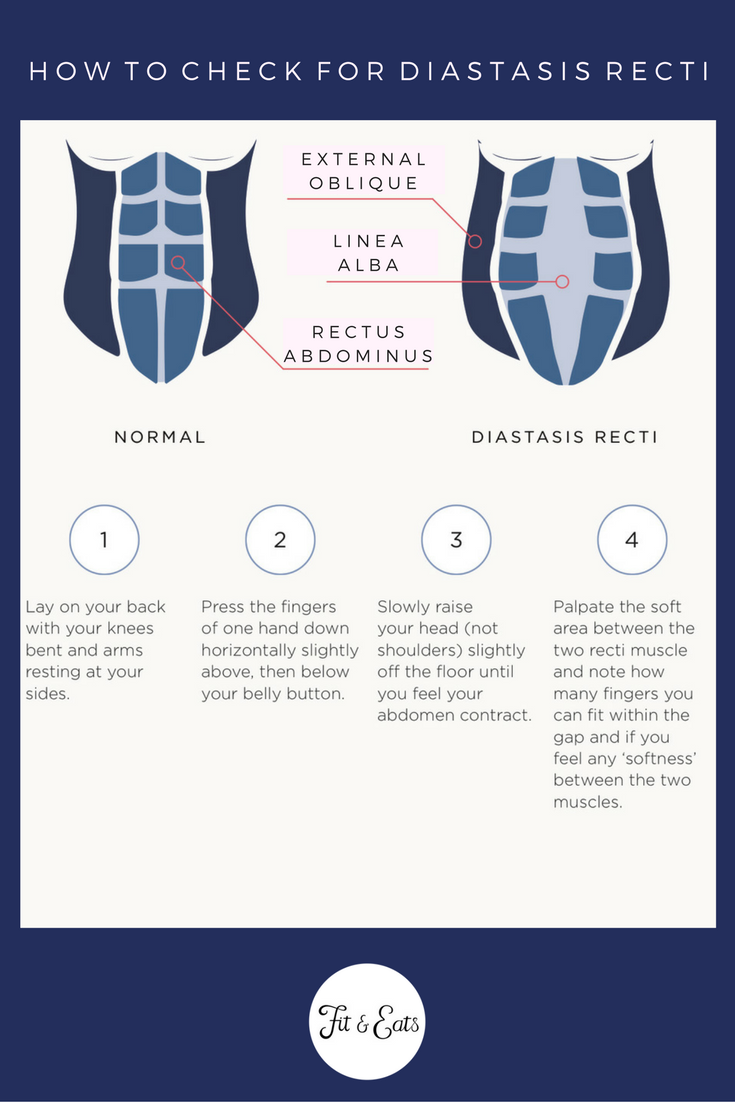
You just had a beautiful baby and you are in the midst of poopy diapers, sleepless nights, breastfeeding pains and lots of loving cuddles and kisses. Then (if you are lucky) your OB or Midwife tells you that you have Diastasis Recti!! You may have herd this term before but didn't think much of it. Don’t panic, there is a lot that can be done to help reduce the gap, bring back the tension in the linea alba and reduce/stop symptoms.
First things first, it is important to understand that Diastasis Recti is a symptom of an underlying issue. After carrying a baby for 9 months (give or take) your body goes through postural changes and adapts to the growing baby. After giving birth some bodies struggle to return back, leading to excessive pressure in the abdomen and pelvis. The body can not manage the pressure effectively and you begin to experience symptoms like urinary leakage, pelvic pain, low back pain and abdominal bulging (aka the mummy tummy/Daistasis Recti).
There is a lot more awareness about diastasis recti in postpartum mamas, which is AMAZING!! However, there is also a lot of misleading information on the internet for new moms. Before you start searching the world wide web for the best exercises to flatten your ‘mummy tummy’, how to bounce back after baby or how to lose the belly fat…keep reading!
Recovery postpartum isn't about JUST flattening the mummy tummy or losing the weight. It is about restoring the correct function of the core. The core is a multifaceted system which needs to be worked as a whole and in different dimensional movements. So please, please avoid doing crunches and sit ups till the cows come home, this can actually make things worse.
Before you even get to doing the exercises, you need to check out your alignment. Make sure you are in bare feet…Can you draw a straight line from your ears to your heels/mid foot?? Get some one to take a picture of you standing from the side and look. Are your ears, shoulders, ribs, hips and heels/mid foot all stacked and in a straight line? If NOT then take time each day to pay attention and make adjustment. This will allow the muscles to move properly and distribute the pressure evenly.
Proper breathing. Using diaphragmatic breathing with visual cues will help to fire up the muscles in the way that is needed to prevent a build up of pressure. DO NOT HOLD YOUR BREATH when exercising. Ensure you inhale when you lower and exhale when you lift. Bellies inc has a great demo HERE on how to perform the correct breathing.
There are also some great visual cues I like to use include;
- Pick up your blueberry
- An elevator rising to the top floor
- Sipping a milkshake
- Draw your hip bones closer together
Aim to complete 10-15 repetitions of each exercise 2-3 times though, 4-5 times per week. As time goes on you can increase the number of repetitions and begin to change the way you perform each exercise. But for the first few weeks focus on simple movements in tune with your breath.
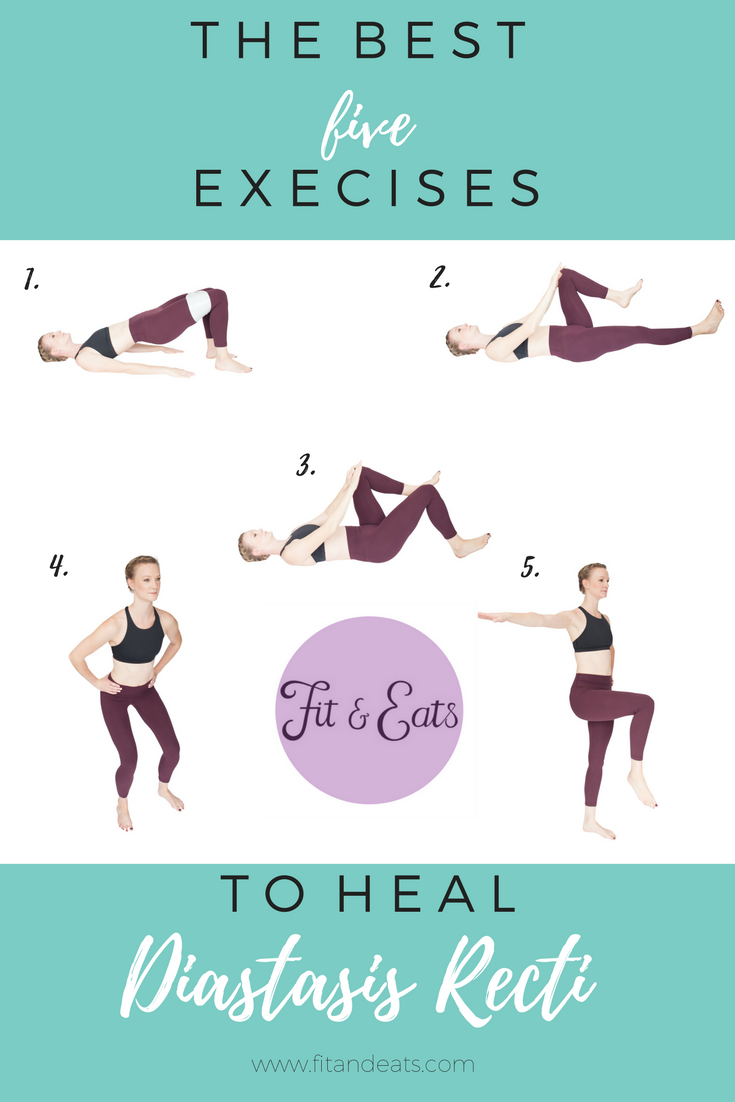
The best 5 exercises to help heal Diastasis Recti.
Exercise 1 - GLUTE BRIDGE - Exhale as you lift your bum off the ground. Focus on moving your spine as one straight line. Pay attention to which muscles are lifting the body. You want the glutes to be doing the majority of the work, not the back or hamstrings.
Exercise 2 - HEEL SLIDE - Starting with both legs bent at 90 degrees. Slowly straighten one leg out in front keeping the heel on the ground. Make sure your lower back is not arching too much as you extend the leg and make sure you are not doming in the abdominals.
Exercise 3 - BENT LEG LOWER - Starting with both legs bent and 90 degrees. slowly tap one heel to the ground and then bring the leg back up to 90 degrees. Make sure your lower back is not arching too much as you extend the leg and make sure you are not doming in the abdominals.
Exercise 4 - BODY WEIGHT SQUAT - Place your feet at a comfortable distance apart (I like a little wider than shoulder width). Inhale as you lower, making sure you can keep the pelvic floor soft. Lower as far as you feel comfortable. Exhale just before you start to stand, lifting the pelvic floor and exhaling through pursed lips.
Exercise 5 - STANDING MARCH - This one seems easy but the key is to keep the hips in alignment as you transfer your weight from one leg to the other. Make sure you don't stick your hips out and stay as stable as possible.


